Thursday, September 27, 2012

Who doesn't need a mid week pick me up???

I know, all of y'all are thinking, "Cayla, Wednesday is a mid week day not Thursday..." well slackers, I work the weekends so today is my mid week day and boy do I ever need a pick me up! I am feeling it folks, between being sick and being an adult I'm exhausted! When is nap time again?!? 

In honor of all of us who hit our snooze button 10 times and then realize we actually shut it off because we just need 5 more minutes to sleep, I am going to post about these amaze-ball energy balls I am taking from a blogger I follow! She has some good ideas for how to get going in the morning, ESPECIALLY for those wonderful morning work outs we all love so much. Some idea's are:

1. Go to bed half dressed for your workout (i.e. workout shorts and a sports bra)
2. Set your alarm somewhere where you have to get out of bed to turn it off followed by...
3. Set a big glass of water by your alarm and drink the majority of it. Water hydrates the body and get's it moving faster than any source of caffine out there. If you have a big glass of water in the morning your body will crave water throughout the day and you will stay hydrated and alert! Yeay!
4. Splash your face with water. It doesn't have to be cold. I wash my face in the morning with hot hot water and I feel 200% more awake afterwards! It's miraculous :)

Here is a little recipe for Energy Balls (that's what I'm naming them) also to help get you going. If you're anything like me you do not enjoy shoving food in your mouth in the morning when your brain is barely functioning, so a quick easy solution is to make these bad boys and just pop them in your mouth as you're getting ready. I am seriously addicted to these things as of... oh 5 minutes ago. 

Energy Balls of Amazing-ness:

1 cup                         Rolled Oats
1/3 cup                     Shredded Coconut 
1/2 cup                     Nut Butter (I used half peanut and half almond)
1/2 cup                     Ground Flax Seed
1/2 cup                     Chocolate Chips (White chocolate, dried cranberries, apricots chopped, etc.)
1/4 cup                     Raw Honey or Agave (I used both, just split them in half)
1 tsp                         Vanilla


You can seriously play with this recipe. Don't mess around too much with the ratio of nut butter and honey to dry ingredients simply because it's your binder. But you can pretty much make these as healthy (or unhealthy) as you wish! 

Here's what you do, add all the ingredients together and mix well. Make sure everything is coated evenly and then put in the refrigerator. I let them go for an hour, you can do longer (they hold better that way). Once they are chilled take them out and roll them into 1 inch balls. I like them small enough to where I can just pop them in my mouth but big enough to where it doesn't feel like I'm eating a skittle :)

Well there ya have it. Take these with you in the car when you know you're going to have a long day. I guarantee you they will give you more energy than that big mac you're about to buy!

Happy Thank God It's Almost The Weekend Thursday!!!!

Wednesday, September 26, 2012

Skinny Alfredo With a Side of 30 Day Shred

Tonight's dinner is served. Unfortunately there are no pictures with tonights dinner... so just imagine this :)

I love pasta, as stated in almost EVERY blog post on here, but I also love fitting into my skinny jeans without a "muffin top" to accompany them. So of course I have to figure out how to make a yummy buttery cream filled meal into a gourmet tasting skinny delicious meal that the Hubs will still eat! And bonus points for making it dairy free... Thank you Thank you! But seriously, do you know how much dairy we consume a day!?! Oh by the way, Veggie Spreads are NOT, I repeat, are NOT dairy free even though the package says lactose free. The difference between dairy free and lactose free is that dairy free can not have any trace of dairy in it i.e. lactose, whey, caseins anything!!! Lactose free only has to have no lactose... that one bit us in the ass. Well it bit the Hubs in the ass :( poor guy.

So anyways back to tonights amazing meal. It is as follows:

Skinny Alfredo (Dairy Free)

1 Tablespoon      olive oil
1 Each                garlic clove minced
1 teaspoon          lemon zest
2 teaspoons         gluten free flour <3 Red Mills Gluten Free Flour
1 Cup                 Almond Milk <3 Blue Diamond
2 Tablespoons    Faux Cream Cheese <3 Tofutti is my FAVORITE!!! 
3/4 Cup              Parmesan Cheese grated (For the non dairy free people)
3 Tablespoons    Fresh Parsley chopped
12 Ounces          Whole Wheat fettuccine (gluten free pasta insert here)
TT                      Fresh ground pepper

On the back burner have a large pot of water, highly salted (think kissing your lover at the beach salty) and BOILING, just in case you missed that on the box,  and add your pasta to it. Let cook per instructions on the back of the box. The way it was explained to me was, "They paid billions of dollars for those directions, I think they know what they're talking about." and I agree. 

Now for the saucy sauce, start by heating up a pan, this will be the pan you make the sauce in so make sure it's deep enough, and adding your olive oil to it. Once the oil is heated add your garlic and lemon zest to it. Heat until the garlic is aromatic, about 30-60 seconds. If you don't "sweat" it enough the garlic wont release the oils properly into the sauce but if you sweat it too much you're going to have some burnt garlic on your hands :) yuuuummm. Add the flour to the oil and stir until it becomes a paste. Once this happens cook it, while stirring constantly, for about a minute. Ideally you'll start to smell a nut aroma which will indicate that you are cooking the flour so it wont taste like there is flour in your sauce. After that minute whisk in the milk and about a teaspoon of salt. NOTE: When you mix heated flour, oil and milk together you are making a roux, which is a thickening agent for sauces. It's the classic way for getting rich, thick, creamy sauces. If you do not whisk enough when adding the milk you will get lumps of flour in the sauce which is bad. So do it right! 

After you add your milk keep whisking for about 3 minutes or until it begins to get thick like you're used to seeing. Add your faux cream cheese and your Parmesan cheese now and continue whisking. Please please please do not just dump all your cheese in at once. Add it in sections so you can whisk until melted and then add some more. You will have clumpy Alfredo sauce if you dump it all in at once. Once all the cheese is melted, stir in your chopped parsley. Set to the side, cover to keep the heat in.

Reserve 1 cup of pasta water from the noodles. strain your noodles and place in a large bowl for tossing. Add the Alfredo sauce and start tossing, this is where you can add the pasta water to loosen the pasta dish up if it's too thick. Serve with extra Parmasean cheese to the dish and top with some yummy grilled chicken!

Bon Appetit Family!

Hahaha you thought I forgot didn't you! Here are the "Before" pictures from my 30 day shred challenge starting tonight. Also, this morning I began my sweets fast annnnnd then my beloved husband brought me a Twix for lunch... luckily I forgot the Twix bar (and the rest of my lunch) at the laundry mat. Lame.

My lovely love handles that I do not love :)

Yeah look at that muscle.... orrrr not.

And the back fat... ugh

Ok challenge on, see the new photos in 30 days! Shout out to all the ladies doing this challenge with me, can't wait to see your "after" pictures! Also, guys, you can get some Jillian lovin' in too ;)


Tuesday, September 25, 2012

30 Day Shred

Well it has finally come to that point. My fat jeans are no longer feeling "fat" on me anymore. I have this lifestyle where I do what I want when it comes to working out or not, eating healthy or not, drinking a beer instead of a glass of wine :) you know, the fun things. But unfortunately with that comes an inconsistency in pants size.

So starting tomorrow I'm jumping back on the horse, I'm going to start doing the 30 Day Shred:

Jillian Michaels - 30 Day Shred

 followed by Ripped in 30.

Jillian Michaels Ripped in 30

They are both Jillian Michaels and I have a secret girl crush on her (serioulsy! Who wouldn't want to look like that!?!)! I know that winter in coming and we are all getting ready to settle in for the next 3 months but I still want to look H-O-T under all Mark's sweat pants and baggy shirts (cause you know you never wear your own clothes once you get married). 

Also... yes that is not it... I am going to take out all sweets for 1 whole week... oh my GOD shoot me now. I am a sweats feen! I love them, I do not discriminate against them in any way shape or form! This is going to be so hard for me, BUT I know that the hardest part of not eating something is the first week! And I know I can do this. My mama ain't raised no fool! So on the blog tomorrow you can see my before pictures (prepare yourself). 

Also, I'm sending out a challenge. I challenge all of my blog readers to exercise for at least 20 minutes, 3 days a week for this whole next month! I know a lot of you are sturggling with the motivation to do it, the accountability to do it and the time to do it. So stop now, get off the couch and do it. The first step is the hardest... 30 minutes is going to go by reguardless so you might as well fill it with something that will enhance your life! 

Tomorrow we will be diving back into the recipes! I have a ton of great idea's from some ladies out there! It's going to be a yummy October!

Also, this month is a heavy month for me. Today we are going to stop and take a moment of silence to be thankful for all who have served, are serving and have given the ultimate price in service for our freedom. Thank you to all the military families out there! You rock my socks off!

Greg Rund 9-25-1983 KIA 12-11-2004 

Happy Birthday Greg!!


Monday, September 24, 2012

DIY Monday

I love Mondays! Seriously :) Both my husband and I have the day off so it's wonderful, and it's the start of a new week... you had a bad week last week, no problem, start new!!! Love Mondays!

So since both the hubs and I come from really large families we obviously have a passion for our families! You can tell if you spend any amount of time with us that we are super close to all of our parents and we have really fun relationships with our siblings! And Aunties, uncles and cousins are basically more parents and siblings! We are so close, it's amazing! Sure we have those wonderful moments at EVER family gathering where someone gets pissed or pisses someone off but hey! what is family without some good ol' drama :)

So today's DIY is all about the good fam-dam-ly. I'm dubbing this "The Family Tree" post. Here's how it goes. 

You wanna get a cheap picture frame (I got mine from Michaels on sale 60% off... used it at my wedding and then turned it into a chalk board) and get some chalk board paint, NOTE: spray paint is some serious business folks... I look like I tried to rip off those alarm things they hook on clothes, that have ink in them, and failed. I would highly recommend going the actual paint route with this one. Take the glass out of the frame and get it somewhere you don't mind getting a little messy. Get some fine grain sand paper and scratch the surface of the glass. You'll have a better outcome if the paint can actually adhere to the surface :) After you have it scratched up and freaking out, wipe it down with a dry cloth to remove excess dust and dirt. Begin painting, do at least 2 coats and let dry for 24 hours. Don't be impatient and try it after 4 or 8 wait the 24 or else you get to do it allll over again. Here's how mine turned out:


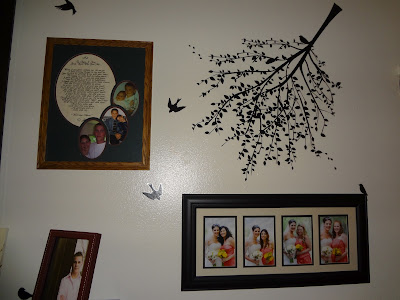
Next you're going to start "assebeling" your family tree. Find a wall, mine is the first one you see walking in, and sketch it out in your head. Then erase that sketch and just start stickering and hanging pictures... trust me, it turns out better that way. Oh also in the middle of it, try to win a new car and go grocery shopping, talk to your dad and mom online and eat dinner with anyone, then go back and continue. I love breaking away from a craft half way through... sometimes I think we get so focused that we loose focus of having fun and plus 2 ideas are better than 1 so why not make yourself forget your idea and then come back with a new one. It's great fun. Annnnyways, continue. Since pictures are worth 1,000 words I will let them talk now.


This is the starting wall. I laid everything out and pictured it in my head.


I learned this trick where you measure the distance between the two nail holes with duct tape and then stick it to the wall. That way you don't have 50 holes in the wall by the time you get them lined far enough apart and level. Crazayy.


Here is what my finished picture frame chalk board looks like... btw that is not a free hand drawing, yeah, right. 


So here's the deal, those branch looking stickers are actually "trees" for like ants or something. For some reason in my head, 2' tree was more like a 6' tree, I don't know... but anyways I was a little confused when I pulled them out of the package. So I made them into "branches" BUT if you look carefully in the top left side there is a bird that is upside down... do you see him... ok yeah, that's our secret! 

This is our new "Family Tree" wall and I am so happy that it is up! Cheers family! I hope to see your face on it one day! Oh and of course to add a couple more of our own little family member faces to it.


Happy Monday

Friday, September 21, 2012

When You're Feeling Blue

I have been laid up in bed sick for the last 3 days... hence no new posts. So I am posting today about home remedies for making your body feel better when sick :)

We all love the sickness, you know, when your body aches and it feels like your half getting your period, half having a child and half in the cage at a UFC fight...<--watch that yeah that kind of sickness. Oh and don't forget the constant scratching of sand paper on your throat :) Yeay!

Here is how I make a quick comeback while feeling blue. Lay down! Seriously, do you know how much energy you're exerting by standing up? If you are simply just standing for 8 hours in a day you burn one calorie per minute. And that's just from standing, that's not from chewing, walking, bending down, the occasional laugh, you get what I'm saying. I can pretty much guarantee you that when you are feeling sick you are not giving your body the proper intake of calories to outtake of calories. So when you're eating nothing but soup or broth and only drinking tea you are literally starving your body. Bring on the dehydration!! But if you are laying down you are only burning nearly HALF the amount of calories as standing. 

Now that your laying down turn off the computer and turn on a movie or simply shut off the electronics and stare out your window. I know that sounds so boring and gosh you have so many things that need to get done, but I'm telling you they will get done in 1/4 the amount of time when you're working at 100% than when your body is working at 15%. So take a you day or two and suck it up Sally. You need to rest your brain as much as your body. If you aren't allowing your brain to rest it will send out signals to the rest of the body to move and you will get restless and start moving. This is bad and pretty much a for sure sign that you will be sick for at least a week.

Now here comes the healing part. Go put some water on the stove and boil it. Get yourself 2 ceramic mugs and 1 plastic cup. In one of the ceramic mugs put about 1 Tablespoon of salt and about 8 oz of water. Let the salt dissolve. In the other mug get some honey, some cayenne pepper, some water and some lemon. 

Miracle Tea:
Squeeze half a lemon
a dash of cayenne
Tablespoon of honey
Dissolve it with 8 oz of water

It's a tea mixture that'll sooth your throat, open up your air ways and help you get all that mucus out of your system. Start by gargalling the salt water, do this for about 2 minutes, spitting it out and getting a fresh sip every 30 seconds. Lay back down to you sappy chick flick and start drinking your tea... now ladies... this isn't Sunday night football and you're not at the bar throwing back a beer with the fellas. Take it slow, you don't want your tea to get cold because that's nasty, but you don't need to shoot it either. Here is where your plastic cup comes in handy. You will start coughing up mucus now. Instead of swallowing it (I know it sounds gross but we've all done it) spit it into the cup so you aren't getting up every 30 seconds. Please remember to hydrate all day long with water. It is a necessity for the body to heal and it thins out mucus making it easier to come up.

For dinner I love me some good ol' chicken broth. No, not chicken noodle soup, because if Im going to up chuck I want it to be smooth, not visual! No one wants to see Campbell's dinner in a toilet bowl. So get you some yummy chicken broth, preferably the kind made with chicken and vegetables and nothing else. If your chicken broth has more than 5 ingredients in it (Chicken, onion, celery, carrot and water) then you might want to stop using it. Seriously, chicken broth does not need preservatives in it and neither does your body. Warm some up on the stove, get in you snuggy or your footy pajamas <---my personal favorite and turn on another chick flick. 

Now, I know a lot of you have children. Lucky. I don't know what to tell you? I'm sorry you're feeling crappy, most likely one of them gave it to you, sucker. Buckle down and pray that your husband will watch them for an hour :)

Well Family, Happy Healing!

Tuesday, September 18, 2012

Dairy Free Chocolate Chip Cookies

Hello Tuesday, how nice of you to show up with a monsoon in New York... seriously folks it is pouring cats and dogs over here, all day! It was nice though, we were very quiet at work, not a lot of traffic and since today is my Monday I'd say that's a pretty good start to the work week.

Now that it's getting into holiday season and everyone is going into baking mode overload I thought I would start the seasons off right with some good ol' chocolate chip cookies. This really isn't going to be a "get all crazy and creative" blog post... sometimes it's good to go back to the basics and be a child again!

Chocolate Chip Cookies:
1/4 cup soy milk
1 cup oil
1 cup sugar
1 cup brown sugar

2 each eggs
1 1/2 teaspoons vanilla
3 cups flour
1 teaspoon baking soda
2 cups dairy/soy free chocolate chips

Start by making a "butter" from the soy milk and oil. How you do this is by placing the soy milk in a blender, food processor or bowl (only if you have a hand burr mixer) and turn on the motor. Add the oil in slowly until it starts to thicken like butter. Once you've made the "butter" transfer a cup of it into another bowl or your Kitchenaid and add the two sugars and cream them together. Basically that means beat them until they're fluffy-ish. 


Sift your flour and baking soda together in a separate bowl, aka mix well, and then add the remaining of the ingredients except the chocolate chips. Once everything is mixed together well, go ahead and fold in the chocolate chips. 

Spray or grease down a cookie sheet or two and place tablespoon size serving of the dough on them. Bake them at 350 degrees for 12-15 minutes or until golden brown. set on a cooling tray and let cool or eat fresh out of the oven with a huge glass of milk/soy/almond milk.


There you have it guys! Enjoy being a kid for a couple minutes on this lovely day!


Monday, September 17, 2012

DIY Monday

Ok guys, I'm starting a new trend on this blog! Every Monday will be a DIY project! This should be easy with all the awesome holidays coming up and the changing seasons, we'll see where we're at come mid February!

For today's DIY project, I decided that we needed a wreath for the front door. It's so funny, as a kid I always thought they looked so strange and were so unbelievably unnecessary, but now, as an adult-ish person with my own home, I kinda really like them. 

I went to Michaels and scored BIG on all the supplies. Apparently everything is 50-70% off while it's in season??? It's only full price before season, cause that makes sense right?! Anyways, I went and purchased a stick wreath base, a couple bundles of "fall" looking flowers and leaves and a wooden letter "B" for Bell... cause that's our last name in case you weren't sure :)

Here are my selections:


First you want to start off by getting a pair of wire cutters... trust. I used scissors and was bending the stems back and forth at least 12 times before they broke apart. If you don't have wire cutters than I hope you have someone who is willing to rub your hands afterwards :) I don't... laaaame. So, start by cutting all the flowers off the bundle. Make sure you leave at least 5 inches on the stem, I just cut at the base, right before the individual stems go into a single wad. 


Next, start with your largest flower. Place it in 3 different spots throughout the wreath. I don't think that evens make very eye appealing patterns so I always go odd. It's a personality trait ;) You can double up in places with the larger flowers. I went with Star Gazer Lillis because they are my absolute favorite flower ever! This is what it should start to look like


After you have the base flowers set out you can decide how full you want your wreath. Some people love the "bigger is better" look, personally I like the rustic look of some of the wooded wreath showing through so I went a little more sparse on the flowers. I like the clean look of not having an overpowering amount of flowers. You can fill in flowers all around the wreath or choose to only do certain sections. Fill in the areas around the larger flowers with some smaller flowers and some leaves. I also did some faux berries and leaves in with my flowers.

If you decided to add some extra non-flower things to your wreath like a "welcome" sign or a letter, make sure you leave enough room without flowers or minimum amount of flowers in the area so you can place it. I simple took off the bottoms of the flower bundle stems and put them in the wreath to hold the letter in place. I'll probably end up putting some wire on it and tying it to the actual wreath, but the letter was a little wet from chalk board paint so I didn't want to mess with it too much.

Here is my final product!


I like it.... and it wasn't an obnoxious $27 like all the other wreaths in the store. Plus I still have some flowers left over for another DIY project for fall!

Happy Monday Ohana!!!

Friday, September 14, 2012

Going to the South, New York Style

Tonight's dinner is one of my favorite meals to eat and cook :) well sorta, if I were better at timing it I would like it a whole lot more. Tonight's menu is fried chicken, sauteed asparagus, and Faux mashed potatoes aka "pureed cauliflower". 

Fried Chicken:

                    10 each                                   Chicken parts ( I mixed up legs and thighs)
                    2 cups                                     Buttermilk

*Marinade the chicken in the buttermilk for 6-8 hours and no more than 24 hours


                           3 cups                                     Flour (you can do a GF flour here I didn't)
                           2 Tablespoons                       Chili powder
                           TT (to taste)                           Salt and Pepper
                           4 each                                      Eggs
                           1-2 cups                                  Oil

Mix the Flour, chili powder and salt and pepper together in a gallon plastic bag and set to the side. In a separate bowl crack all the eggs and scramble them (with no heat, just mix the furiously). Drain the chicken for a minute or two and then begin the process. Cover the chicken in egg and then throw in the "flour bag". Once your bag is 3/4 full zip it shut and shake, shake, shake it, shh, shh, shake it good, shake it like a Polaroid picture!!! Take the chicken out and let it sit for a couple minutes and then dredge it again. You can do this up to 3 times, this builds a nice thick crust on it once you fry it.

In a cast iron heat oil till 350 degrees. Test it with a piece of the chicken to make sure it is the perfect temp or you can temp it with a high temperature thermometer. make sure that you don't put so much oil in the pan that when you flip it to fry the other side you have any chicken over lapping. Because then it gets burnt and that's no fun. It takes about 10-12 minutes to fully cook to the middle and that's another reason why you don't want to have the oil to high. 


Unfortunately, I didn't cook mine all the way through so I threw mine in the oven at 350 for about 10 minutes. It did the job! And then I ate it all up yuuum!

Cauliflower Puree:

                                                     1 each               Medium head cauliflower
                                                     TT                     Salt and Pepper

*Add butter and milk for the right texture. Depending on everything depends on how much you should use. I used about 3 tablespoons vegan spread and 1/2-1 cup almond milk. It was a tad runny but I like it that way. 

Steam the cauliflower until it slides easily off a fork and place in blender or a food processor. Blend with all ingredients until smooth-ish... it'll still be a little textured because the cauliflower doesn't break down completely like potatoes.


For the asparagus you can do as you please. I cut them into 2 inch pieces and added olive oil, salt and pepper and then sauteed them. I like them warm but crunchy.


And then you set up your table with beautiful wedding china and a lovely glass/bottle of wine or water and enjoy a very southern meal in a less intimidating setting. I can eat this meal and not feel so terrible about consuming it :) Toast! Enjoy Family!


Wednesday, September 12, 2012

Vegan Zucchini Bread

Hola! I made it! 

Here it is folks... my first VEGAN bread! What?! Dairy free... gluten free... VEGAN? Yeah, I know, I'm a rock star! Juuust kidding. But seriously, this is amazing! I am so thankful that God gave me a competitive spirit because I would not be able to do this if it wasn't for the "haters" <--- yeah I'm bringing that word back telling me I couldn't bake to the peoples needs without proper training. Umm last time I checked, YouTube is indeed proper training. Can I get an Amen!

Alrighty, without any further ado I give you the beautiful, the wonderful, Vegan Zucchini Bread!

Vegan Zucchini Bread

                                                   6 Tablespoon            Ground Flax seed
                                                   1/2 cup                      Warm H2O
                                                   1 cup                         Brown Sugar
                                                   3/4 cups                    Agave
                                                   1/2 cup                      Oil
                                                   1/2 cup                      Apple Sauce
                                                   1 teaspoon                 Vanilla
                                                   3 cups                        Sorghum Flour
                                                   1 Tablespoon            Baking Powder
                                                   1/2 teaspoon             Baking soda
                                                   2 teaspoons               Nutmeg
                                                   1 Tablespoon            Cinnamon
                                                   1 teaspoon                 Salt
                                                   1 cup                         Walnuts (optional)
                                                   1 cup                         Blueberries (optional)
                                                   1 each                       Zucchini Grated (not optional)

Go ahead and do everything backwards. DO NOT add all the dry ingredients together first and mix well. No, in fact, add the flax seed and the warm water together first and let it steep.  


While that is steeping go ahead and add all the wet ingredients together and beat them until they are mixed well. Continue on with adding the dry ingredients together and making sure they are all equally disbursed. Combine all the ingredients into your KitchenAid, or you can pretend that your hand is the motor and use a whisk and a metal bowl, and mix all the ingredients together EXCEPT your add-ins. Once your dry ingredients are moist FOLD in your add-ins such as blueberries, walnuts, cranberries, dried oranges, etc. 


Your oven should be pre-heated to 350 right now, if not hurry, run over there and turn it up.
Now wait for it to get there... wait for it... wait for it.... DING! Ok bomb, now turn it down to 325. Lame I know. Fill up you tins, I did muffins because I was going to do the mini pans but funny story, I tried this recipe the other day and completely bombed it, and I mean bombed, ruined the nation of my body with them! Gross. So I did cupcakes again! Yeay! 

Bake them at 325 for 30 minutes if your doing cupcake holders and 50-55 minutes if you're doing loaf pans.


Enjoy! Feel free to post pictures in the comments section of your works! Have fun and enjoy this time of experimenting, make sure you're challenging yourself. mix up the ingredients a little and make your own Zucchini muffin recipe! It's an amazing feeling, trust me :)


Monday, September 10, 2012

Enchilada Mayhem!

Me encanta la comida Mexicana!!! 

Which means, Mom... I love Mexican food :) well minus the mom part. Thank God I married a man with a wonderful family who knows there stuff when it comes to cooking the Hispanic yumminess! When we were out in California for our wedding reception, my mother in love decided to hand make enchiladas and tamales! And guess who was so lucky to be recruited for that fun day of cooking... not me! Lol I kid I kid. I was right there through all the saucing and rolling and panning! Good! So tonight in hopes of one day being able to cook as good as them I am trying my hand in the Enchilada business... solo... alone... by myself, well with the hubby too. Heeeere we go!

Enchilada Sauce:

                                                   3 Tablespoons          Chili Powder
                                                   1 Tablespoon            Sorghum (or alternative glueten free) flour
                                                   1 teaspoon                Cocoa powder
                                                   1 clove                      Garlic
                                                   1/4 cup                     Onion Minced
                                                   1 teaspoon                Oregano
                                                   1 cups                       H2O
                                                   1 cup                        Chicken Stock (or another cup water for vegan)
                                                   1 8 oz can                 Tomato Sauce

Sweat the garlic in a hot pan, large enough to hold the 3 cups of liquid you'll be using. Sweat the onion and then add in the garlic until it is aromatic and then add your chili powder. DON'T TAKE DEEP BREATHS OVER THE PAN. You will literally burn your throat. You're enhancing the chilies in the powder by dry heating them in the oil.  

Add your chicken stock, water, tomato sauce and oregano and bring to a boil. Once at a boil reduce to a simmer and let the sauce reduce until it reaches the consistency you desire. Some people like there sauce a little more think/runny than normal. I let mine reduce until it was like velvet running off the spoon. Not globby and not like water... somewhere in between. I know, I'm awesome at helping you figure out the right consistency! Score :)

Please feel free to NOT tell me how to make your own tomato sauce. I know the ingredients but honestly I'm feeling a little lazy tonight :) if you wish to make your own from scratch please do! And if you don't feel like making anything that feel free to go to the store and buy a wonderfully large can of Enchilada sauce and warm it up on the stove top. Just an FYI though, all enchilada sauces how flour in them so if you are trying to do gluten free I would recommend making your own.


Enchiladas:

                                                           1 each                 Onion small dice
                                                           1 can                   Black olives minced (optional)
                                                           2 #                       Shredded Chicken 
                                                          12 each                Corn tortillas
                                                           3 1/2 cups           Enchilada sauce
                                                           1 cup                    Daiya Cheese 

Start off by placing a pan on the stove top with enough oil in it to sip your corn tortillas. I would say somewhere around 1/4 to 1/2 cup of oil. You choose what kind of oil you want, I'm lame and use Canola oil. Sue me, it's cheap and I'm broke! 

Set your tortillas off to the side and get a pan full of the enchilada sauce you just made (warmed up). I prefer to use a pie pan, I like when you put round things inside round things... square just doesn't cut it for me. Dip the front and back of the tortillas in the enchilada sauce and place them in the pan. Put a decent amount of chicken in them and fold them over. Make sure you have enough enchilada sauce on your tortillas that once you close them they stay shut, or else you just have lame tacos at the end. Not cool. 

Continue doing this until your pan/s is/are full. You can either put your cheese on the inside and top or just the top, same with the onions and olives. I chose to put the onions and olives inside AS WELL AS on top. Whoa, take that Chuck Norris.

I'm trying to figure out how to get videos from my camera onto YouTube so ya'll have the privilege (ha) of watching me cook live. 

Oh completely not relevant to this post, someone "informed" me yesterday that ya'll was spelled y'all and not ya'll. Really?!?! Technically it shouldn't even be a word because it's lazy talk so who cares how it's spelled? Apparently not me because I will continue saying ya'll and spelling it that was also!

Annnd back to the post! Once everything is assembled, place it in your pre-heated oven, which is 350 in case you haven't ever read the back of a brownie box before, and bake them for oh maybe 20 minutes. You choose. Everything is already cooked so you might be in a hurry and don't mind flimsy tortillas or you might not be and want crunchy taco styled tortillas. Either way, you rock! I did 20 or was it 15 I don't remember. But I did cook them!

Here is a picture break down of how it went:

Start by "softening" your corn tortillas in hot oil

Set up you station to produce the pan of enchiladas: Enchilada sauce, softened tortillas, toppings/stuffing and the pan you're going to put them in.

Dip the softened tortilla in the sauce on both sides and wipe excess sauce off.

Place the tortillas in the pan and stuff them. You can do the closed sides up or down. I do mine up. And the end result....


Bon Apatite! Apatita Bueno! Good Eats!

Sunday, September 9, 2012

Crock Pot Chicken

I LOVE my crock pot! Who came up with that thing... they're a genius. I know it's probably not safe and healthy for the environment (or my wallet) to leave something on all day, pulling from the electrical plug in my apartment, BUT I don't really care, because the fact that I can cook something in 6 hours without actually doing anything really makes me one happy girl!

The other night I decided I wanted chicken. Yeah, rotisserie chicken is good and all but there is nothing like a salt rubbed chicken slow cooking in nothing but heat and it's juices, ugh drool-a-thon in my mouth! So I went to the local Stop and Shop... that's the equivelant to King Soopers back home, and I bought me a raw whole chicken, guts and all. Well I didn't cook the guts, no one in this house would even think to touch those babies, but I did cook it on the bone!

So heres how it went down:

Rub the chicken generously with Kosher salt, I love the flavor of kosher salt. Put the chicken in the crock pot and cook it on high for about 3 hours. Be smart, temp the chicken before you take it out. It should be at at least 160 before you call it good. The carry over of the heat in the meat will take it to about 165 which is where you want it before you chow down on it. I cooked mine to about 155 because Im going to turn it into chicken enchiladas and I wanted to be done.

I put the chicken on at 6pm after I got home from work because I wanted to be able to test it at several different times to give you guys the best temp/time for cooking it. I'm sure if you wanted to leave it all day you could put it on low and let it go for about 6-7 hours. Here is what mine looked like afterwards


After the chicken was cooked I separated the meat into my KitchenAid and my bones, tendons and skin onto a different plate. I'm not a fan of chicken skin (although it is soo yummy) so I choose not to incorporate it in anything. I leave it on while cooking the chicken because the fat underneath it makes it extremely juicy :)


Using the hook attachment I shredded my chicken. 


So there you have it! Easy peasy shredded chicken that is so flavorful and easy to incorporate into any recipe (chicken tacos, chicken enchiladas, chicken chicken, etc.). Tomorrow the hubs and I are going to make GLUTEN free enchilada sauce and enchiladas. Yes, in case you have never read the label or made your own enchilada sauce, there is indeed flour in enchilada sauce. Say what?!?

 No worries, I'm here to show you how to eat yummy and healthy all in one :)


Wednesday, September 5, 2012

Welcome To Our Humble Abode

Alright you asked and you shall receive! Tonight I know I said I was going to do the crock pot chicken but unfortunately the chickens and I didn't get along so I will cook them tonight and have it up tomorrow :)

Tonight I'm going to walk you through our apartment and show you how we decided to set it up. It's so much fun going from having enough stuff of your own to fill a mansion, to sharing an apartment with your spouse (NOT!). But here are some ideas for organizing so that you can cram more crap in :) yeay!

Welllll lets get started! With the bedroom :) Now ya'll know I LOVE my shoes... unfortunately they were one of the items I did have to go down on in quantity because lets be honest... no house on Earth could have fit all the shoes I had. But here is how I store my shoes. All my flats hang on the back of my door and all my heals are on shelves in my closet. 


It only took us one try to figure out how we wanted to set our bedroom furniture. THANK GOD. 


 (Guess which dresser I gave to the hubs haha)


 I LOVE my laundry baskets! They are so convenient to take to the laundromat, they velcro on and off so I can sort them out at home during the week and jsut take the loads there. Just an FYI we sort dark's, colors/lights, towels, and the honeys smelling work/school uniforms.

 Inside the closet I found these awesome hangers at Bed, Bath & Beyond. They seriously free up so much space for both of us. I have all my hoodies AND jeans and regular T-shirts hung up inside the closet and you'll see... it's a tiny closet.

 I like that we placed all our towels and extra sets of bed sheets on the top shelf.

In our "hallway" we had the perfect amount of space for my large black bookshelf so I turned it into more storage...

This is where we keep all of our dry storage food. In an apartment that has two chefs living in it, cupboard space is valuable and not to be wasted on dry food storage. So I have all our dry storage and our cookbooks on this book shelf I bought at Target.

Onto the bathroom. I got this nifty little black stand at Bed, Bath & Beyond and I love it :) It has cloth drawers and a sturdy wooden shelf for the "table top" part of it. This is where I store all the girly products, hair products and extra toilet paper. 


I picked up a cheap little plastic thing at Walmart to store all my make-up in.


To the bat cave! Just kidding, it's only our living room :)
 
 (couch and rug courtesy of my mom and Randy!)
 This is our TV stand! I saw it and had to have it! I got it and Target and it's perfect for what I want it for. One day we'll get a DVD stand for our movies, and another wicker basket but for now this is what we got :)

Here are our closet pictures, we have some extremely random things in there.


Our dining room <3
 Drum roll please....... The Kitchen *angels chorus begins*. Ok so it's not that awesome but it's ours and we love it. Here is how we organize in no specific order.


So there you have it. That is our humble abode and how we organize at the Bell house. If ever you need help organizing go to Walmart and grab a hand full of the cheapest plastic bins you can and go home, label, and sort everything and anything. I have mild CDO (that's the proper way to spell OCD for those of us who have it) and I can't sleep unless I'm semi organized... dear baby Jesus help me when I have kiddos. But Walmart and Target saved my life when it came to getting started. 

Plus think about one thing at a time, in the Kitchen do one cupboard at a time, One room at a time, one bundle of items at a time. If you look at everything you need to organize you'll never do it because you'll be discouraged before you even start :)

"Sometimes your organized isn't someone elses clean. Luckily their clean isn't your organized."